

MAC's masonry education is provided by
Walter A. Laska, President - Masonry Technologies
This learning course is approved for .5 (1/2) AIA or PDH accreditation.
Read this article and answer the 5 questions below to receive credit.
Learning Objectives:
1. Learn how composite masonry walls work together as a single masonry member.
2. Learn how thermal movement (expansion and contraction) can cause the outer wythe of masonry to separate from the collar joint.
3. Learn how the collection of water in a collar joint can cause the adjacent brick and mortar to become saturated with water.
4. Learn what the TMS Code allows for preferred grout space in a composite wall.
UNDERSTANDING COLLAR JOINTS


Click drawings to expand to full size.
Collar joints are one of the most misunderstood components in a masonry wall. Architects typically specify collar joints to act as a water barrier. In contrast, engineers specify them exclusively for structural purposes. But can a collar joint successfully perform either function?
The TMS 402/602 Building Code Requirements and Specifications for Masonry Structures defines a collar joint as the vertical longitudinal space between wythes of masonry or between an outer masonry wythe and another backup system. Often, this space is specified to be filled solid with mortar or grout, but sometimes collar-joint treatment is left unspecified.
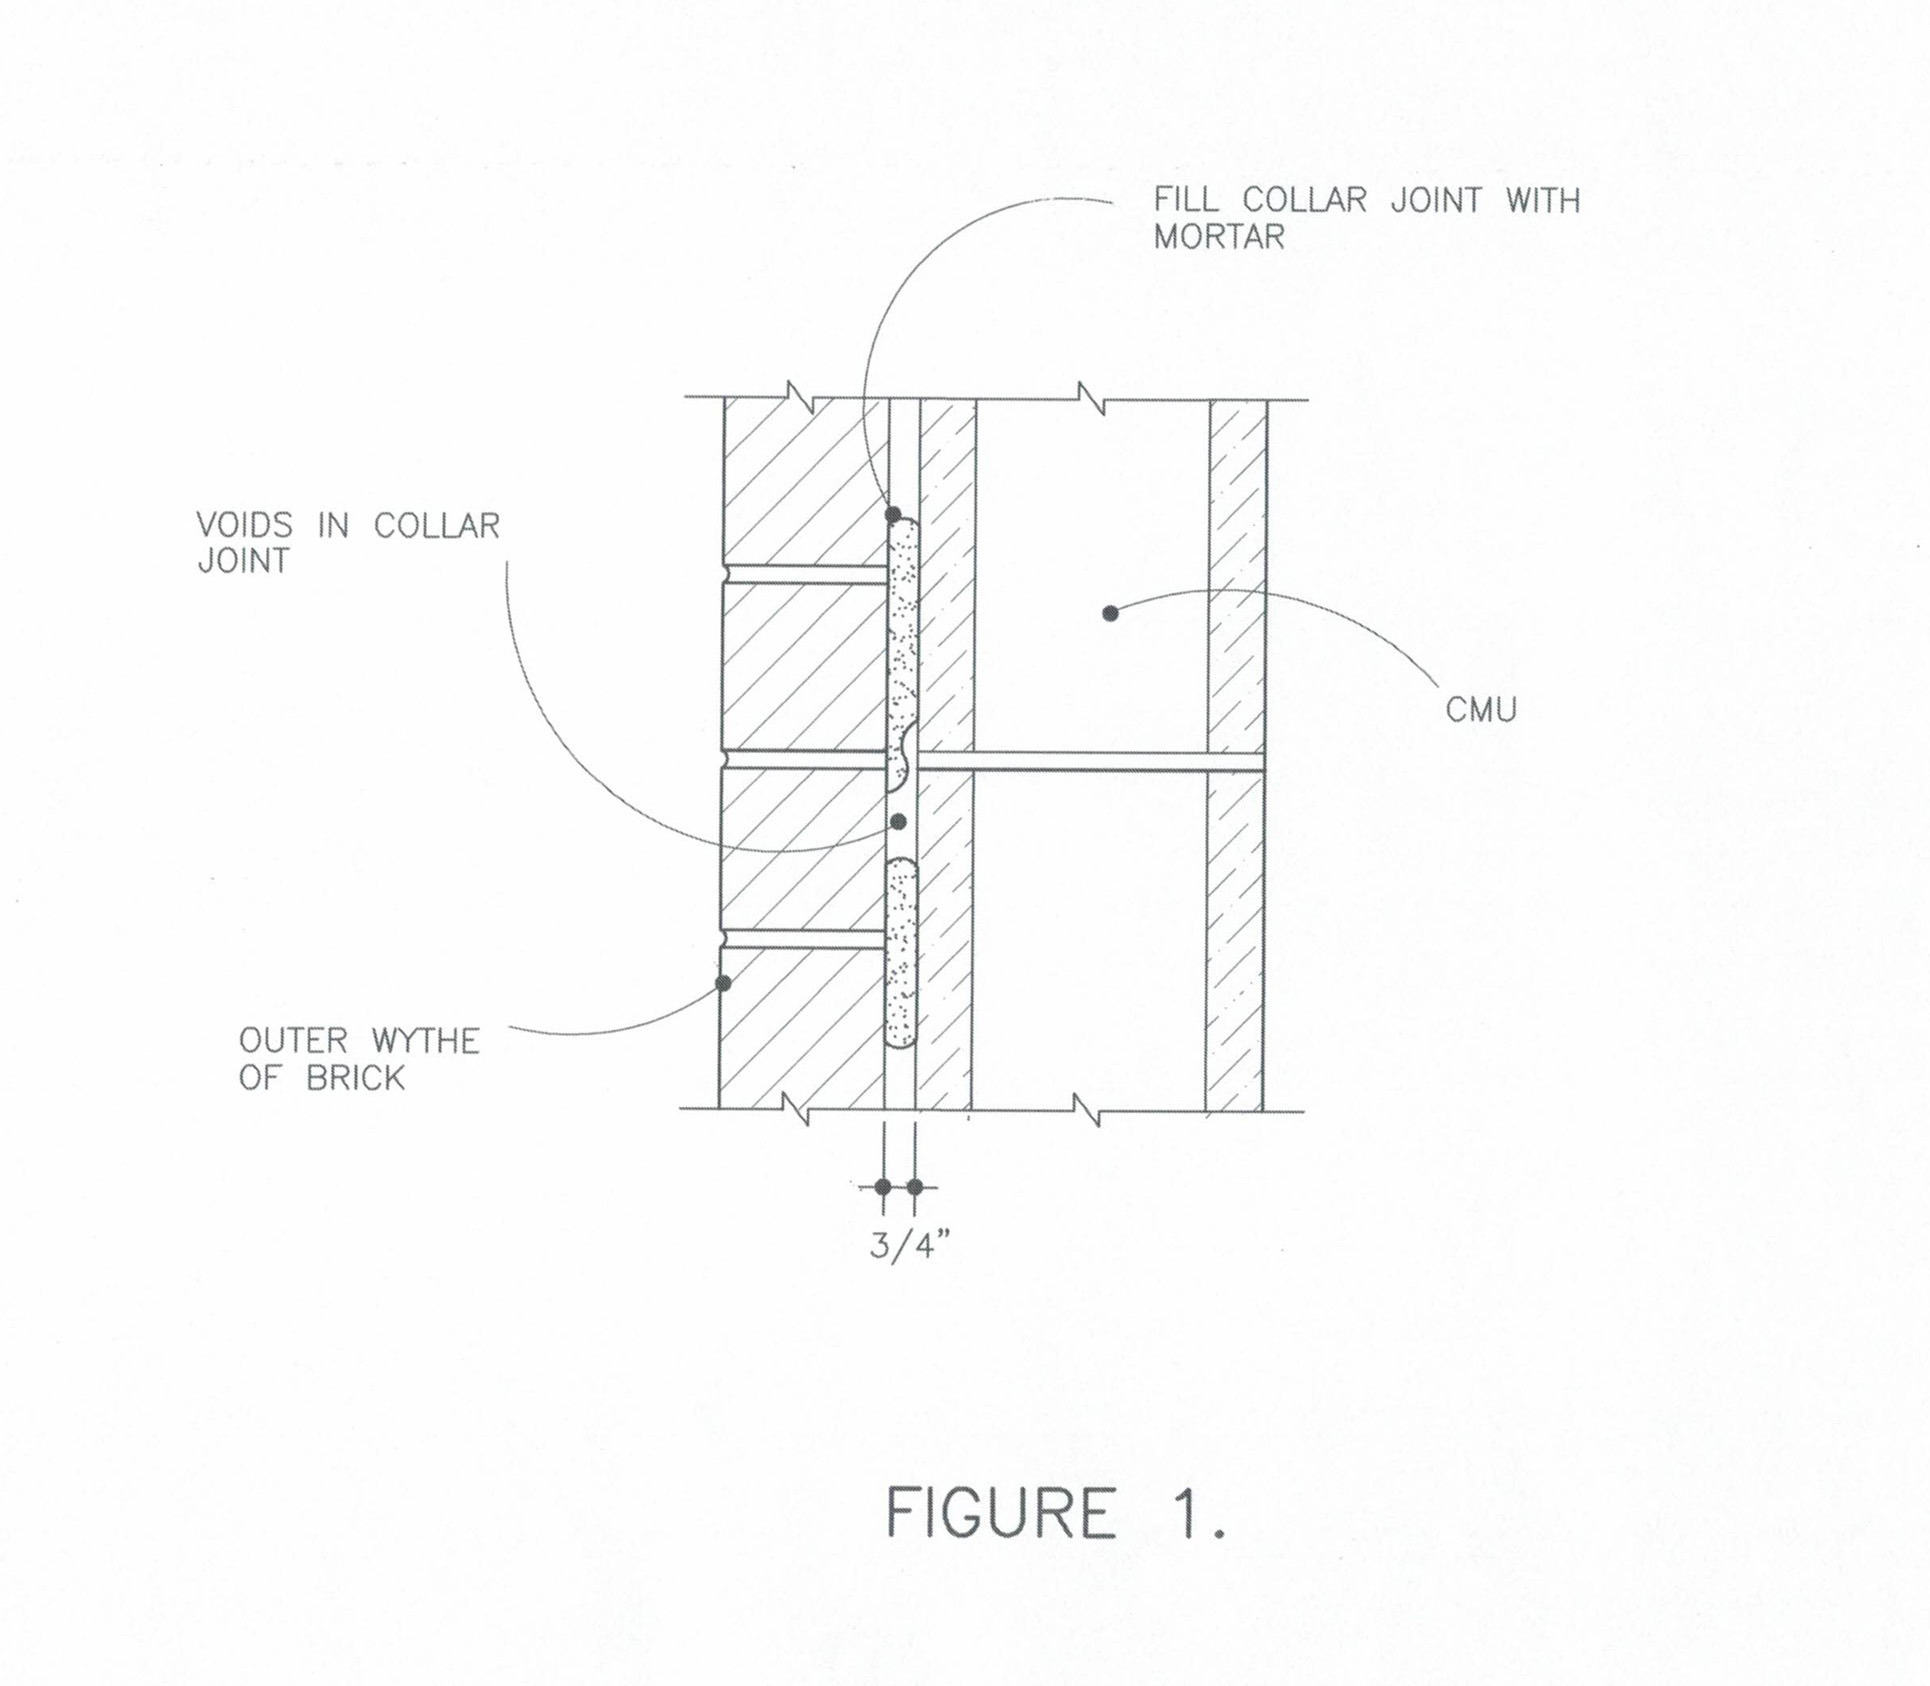
A wall containing a collar joint commonly consists of a 4-inch nominal (3 5/8” actual) outer wythe of masonry and an 8-inch nominal (7 5/8” actual) inner wythe of masonry. The overall wall thickness of this system is 12 inches, and the remaining space is a ¾-inch-wide collar joint.
Collar Joint Function
Architects commonly design a wall system with the collar joint to be filled solid with mortar or grout. In this system, the collar joint is intended to act as a barrier to stop the inward migration of wind-driven rain.
Structural engineers specify solidly filled collar joints to create a composite masonry wall structure. In theory, the solid collar joint bonds the two wythes together and helps generate composite action by transferring stress between the two wythes. In effect, the combined wythes act together as a single member. Composite masonry design is common for 12-inch-wide walls.
Composite masonry walls and barrier walls work conceptually. However, these wall systems do not always perform and are rarely constructed as intended. This is particularly true for mortar filled collar joints.
Collar Joints: The Reality
Cracks and voids in collar joints filled with mortar are common. That can be expected for a number of reasons. Separation cracks sometimes develop between the interface of the masonry units and the collar joint. This can be due to the different absorption rates of each masonry wythe and the fact that mortar-filled collar joints aren’t compacted. (In contrast, compaction occurs in head and bed joints as a result of tooling.)
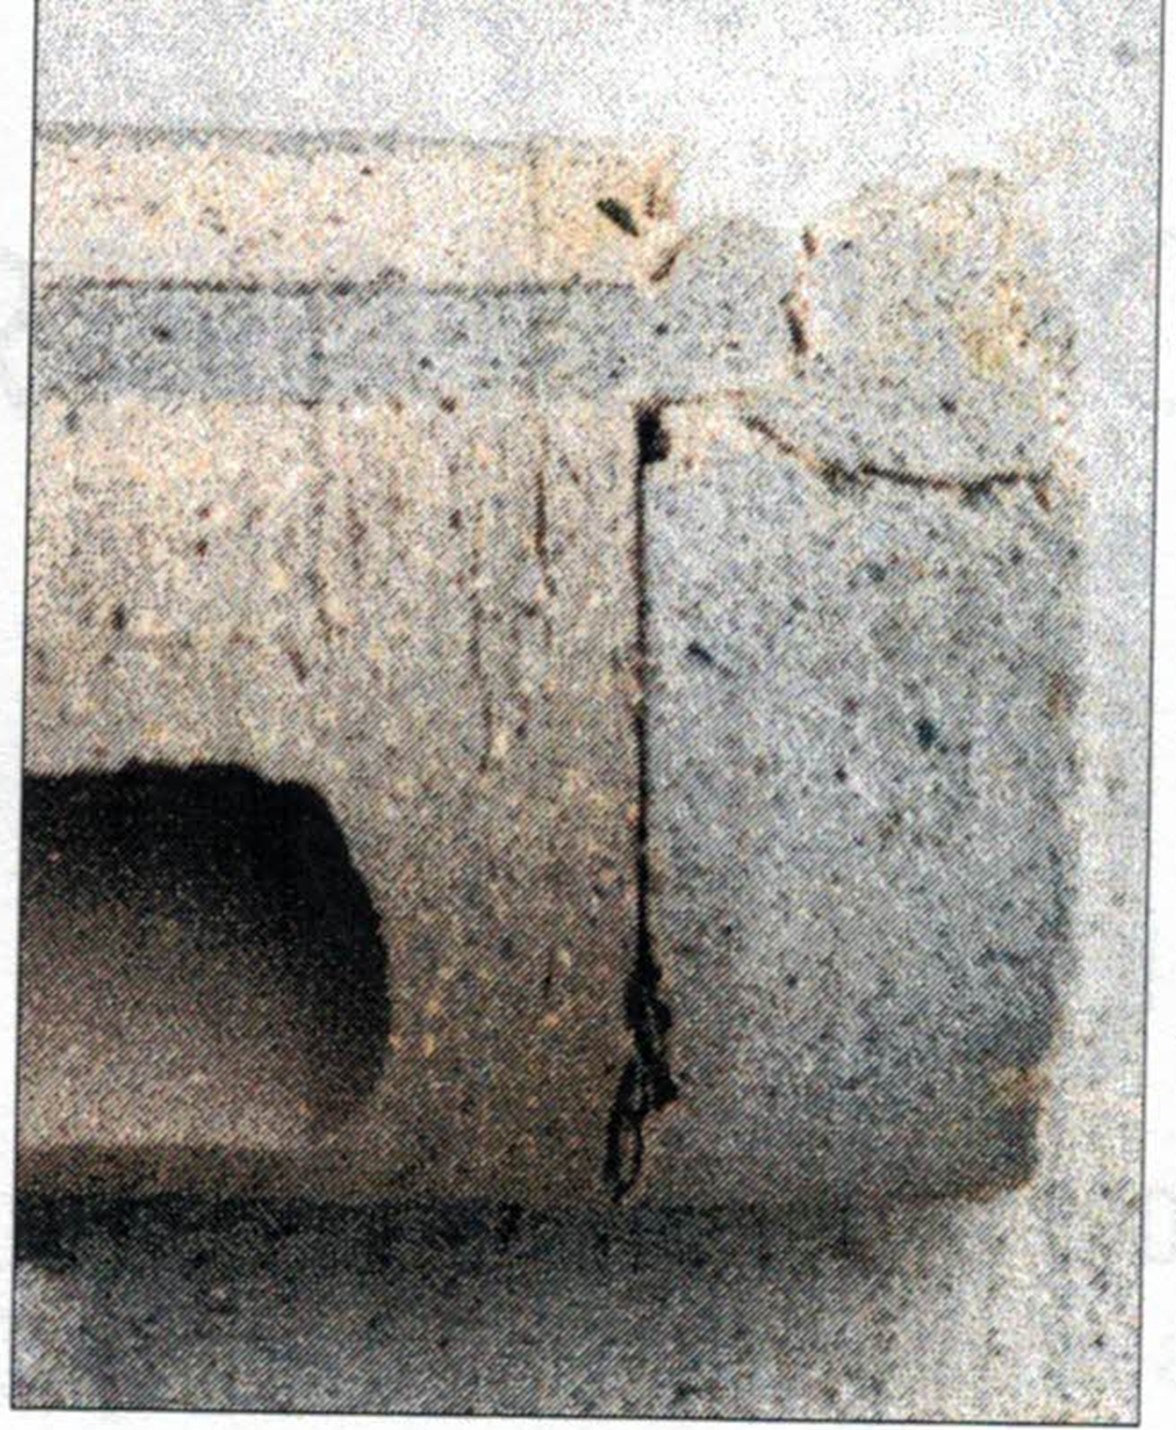
In addition, thermal movement (expansion and contraction) can cause the outer wythe of masonry to separate from the collar joint (photo #1). Moreover, given the absorptiveness of both wythes, mortar used in a collar joint doesn’t contain enough water to fully hydrate the cement, consequently, shrinkage cracks occur, and low strength develops.
Voids in a mortar-filled collar joint will inevitably occur (Figure 1). This is particularly true for a ¾-inch-wide joint, which can be reduced to ½ inch when allowable construction tolerances are considered. Because mortar isn’t fluid, a ¾-inch-wide joint is simply too difficult to fill completely with mortar unless special conditions are implemented.
The TMS Code does not allow collar joints to be slushed (filled by pushing mortar into the space with a trowel). Therefore, the method by which a mason can fill a collar joint with mortar is limited. A mason can either butter the back of the brick before laying the unit or parge the concrete masonry backup shortly before laying the outer wythe of brick. But neither method is foolproof, and the possibility of collar-joint voids still exists.
Grouting a ¾-inch-wide space may prove more successful than trying to fill the space with mortar. However, mortar extrusions and mortar droppings, which are difficult to remove from a narrow space, can cause grout to “hang up” leaving voids in the collar joint.
Research has indicated that walls with collar joints have a tendency to leak, even when the walls are constructed with average to good workmanship. Voids and cracks in the collar joint create pockets where water can collect and bridge to the interior of the building or contributes to the deterioration of masonry on the building exterior.
Also, the collection of water in a collar joint can cause the adjacent brick and mortar to become saturated with water, which will dissolve the water soluble salts and deposit those salts on the surface of the brick, resulting in efflorescence.
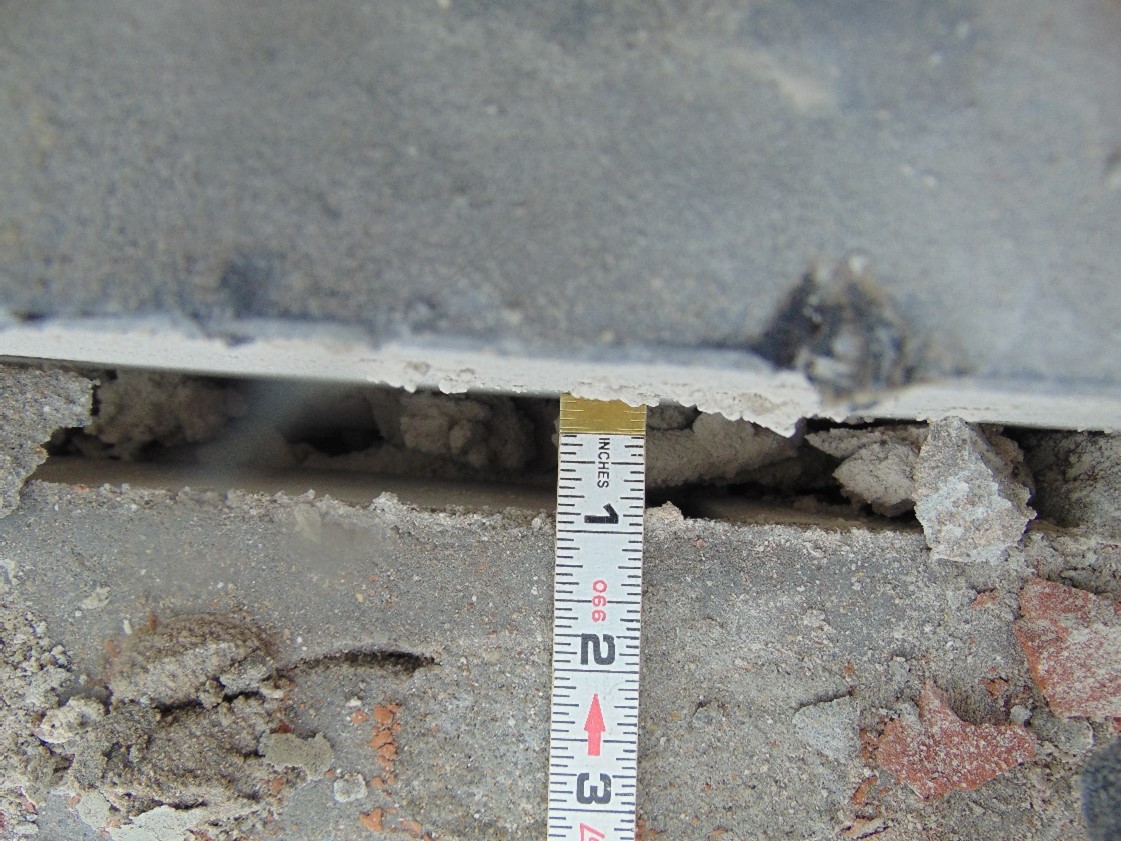
The worst-case scenario can occur when a wall is designed with a collar joint that was not specified to be filled solid or left void. What results is a space that is half-filled with mortar extrusions and half filled with voids (photo #2). This creates an environment that is ideal for the collection and transportation of penetrating water.
What Are the Remedies?
There are several options available which might lead to a solidly mortared or solidly grouted collar joint. These options are as follows:
FIGURE 2
Represents a typical collar joint detail, consisting of a 3 5/8-inch outer wythe of brick, a 7 5/8-inch inner wythe of concrete masonry and a ¾-inch collar joint. The collar joint is either grouted or filled by back buttering the brick.
FIGURE 3
Represents the preferable way to detail collar joints in a wall system consisting of a 4-inch nominal outer wythe of brick, an 8-inch nominal inner wythe of concrete masonry and a 1 ½ to 2-inch wide collar joint. This size collar joint is wide enough to be kept relatively clear of mortar droppings and extrusions, creating a space that can be easily grouted solid. The actual dimensions of the wall system’s components should be called out on the drawing as shown.
The only way to be assured that collar joints are filled 100% solid is to grout them. TMS Code allows the grout space in a composite wall to be a minimum of 1 inch. However, to create a functional barrier wall, this space should be sufficiently wider – 1 ½ to 2 inches – so that the mason can keep the joint clear of all mortar obstructions. Filling the space with high-slump grout and consolidating that grout will produce a 100% solid collar joint that creates a wall system that produces composite action and a water barrier.
Answer these 5 Questions to receive your Continuing Education Credit
Thank you! Your answers will be reviewed and an email will be sent to you confirming accreditation.